Makeshift image sharing using Alfred
I really like this comic by Rakhim:
Blogging is inversely proportional to the number of posts about elaborate blog setups
— Rakhim (@freetonik) November 5, 2020
More comics here → https://t.co/gOsFFvbKHh pic.twitter.com/0mx1aehrES
As someone in the “static gen” camp, I’ve definitely had to suppress the urge to share the intricacies of my own Jekyll setup. Ultimately, I decided against it because… frankly, it sucks. And I don’t mean it in a humble, self-deprecating way. Publishing anything on this blog involves writing Markdown (meh) in several editors (the “nice” one for writing, then the “programming” one for custom markup and final edits), fumbling with version control, running CLI commands, hand-writing image paths, deploying, et cetera, et cetera.
After having to go through all this again for my post from the other day, I resolved to make this mess a little more bearable by at least removing the “hand-writing image paths” step. Currently, most of my blog post graphics are stored in Git with the rest of the content. This means that to add an illustration, I need to create an image, place it into the images directory, then finally link it from the post (and try my best to remember to commit it). Ideally, I’d rather just take a screenshot and immediately get a shareable public link (a-la CloudApp) that I can insert into my post.
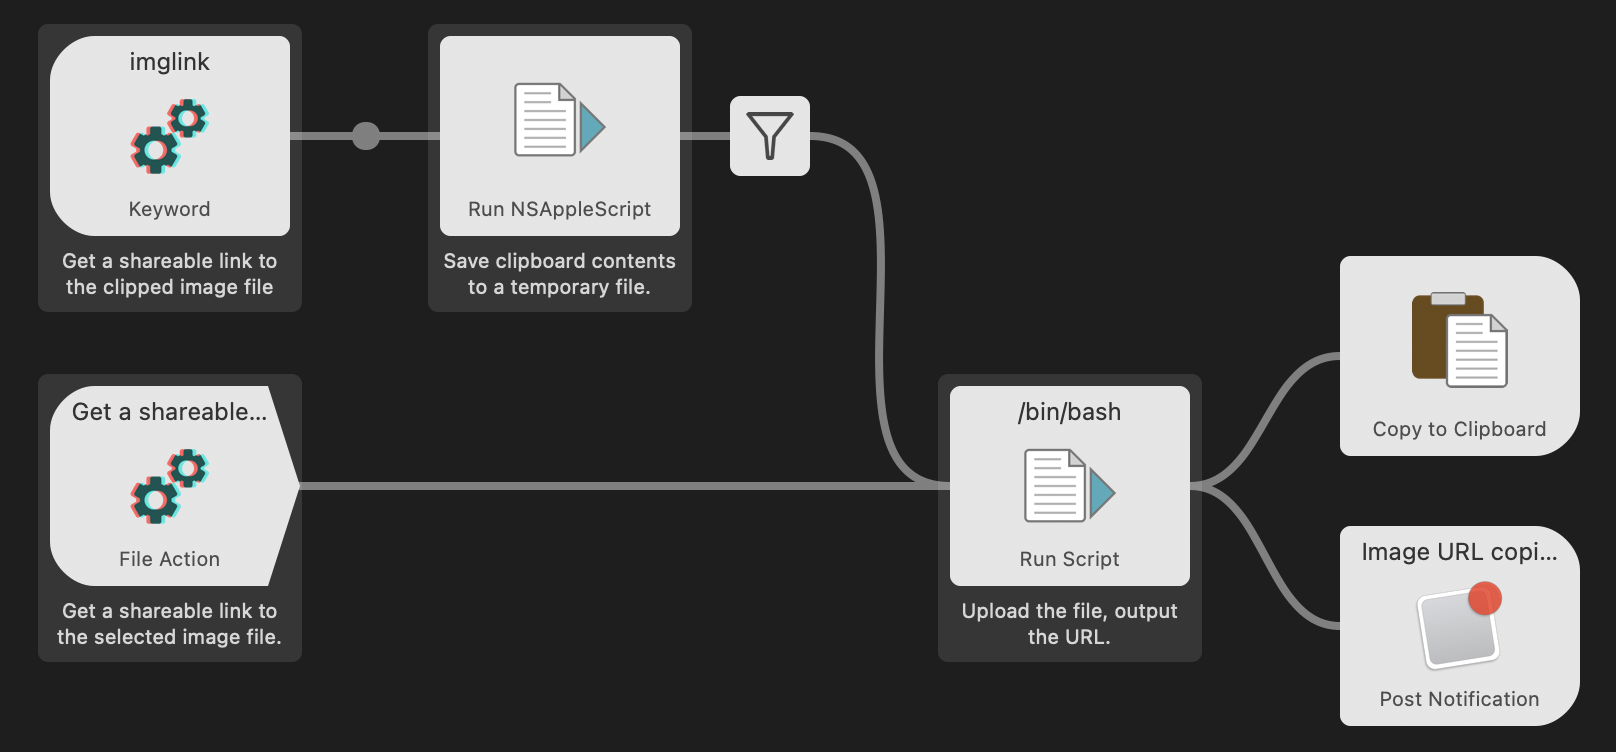
I ended up setting up another Alfred workflow that can accept an image from Clipboard (or a file via Alfred’s File Actions), upload it to my private image hosting server, and paste the generated public URL to the frontmost app.

The image below displays the overall structure of the resulting workflow, which can be triggered either via a keyword (for clipped a image) or a file action.

In contrast to some of the similar workflows I’ve found online, my implementation has no external dependencies and should work on any relatively recent macOS version. To achieve this zero-dependency property, I had to solve the problem of getting the screenshot data out of Clipboard without relying on an external utility like pngpaste (unfortunately, the built-in pbpaste is limited to text and RTF). It turned out that by using some “Dark AppleScript” with raw data format incantations, one can get the desired bytes by casting the clipboard to “PNGf” (four-byte file type code for PNG):
set tmpfile to (do shell script "mktemp")

try
  set fhandle to open for access tmpfile with write permission
  write (the clipboard as «class PNGf») to fhandle
  close access fhandle
  tmpfile
on error errMsg number n
  if n = -1700 then -- Not a PNG clibpoard
    display dialog "The clibpoard is not a PNG image." buttons {"OK"}
  end if
  try
    close access tmpfile
  end try

  ""
end try
Once that step’s done, it’s just a matter of uploading the resulting file to your web server, S3, etc. (I just run scp). I use the uploaded file’s MD5 hash for its destination name, since these paths don’t have to be human-readable (“SEO experts” might disagree). The workflow completes by posting a notification and copying the image link to Clipboard.
I’m pretty happy with the result and I think this shouldn’t create a lot of extra maintenance for me down the line (which is always a concern with “rolling your own”). Of course, there are some (acceptable for me) drawbacks of decoupling image storage from blog content:
- you no longer see images while running the site locally;
- detecting broken image links becomes slightly more difficult;
- another thing that can break :-)
Anyway, I’ve been on a kind of automation spree this past year so there are likely more AppleScript/Alfred posts coming soon. I hope they’re helpful to someone (let me know via email below or on Twitter)! If you think the described workflow could be useful for you, my meta-workflow called Process (includes this workflow) is available on GitHub. You’re welcome to build it from source, run “as is”, study the implementation, cherry-pick from it, or anything, really (all at your own risk).
